Monday, September 15, 2008

Honey Chocolate Chip Cookies

Everywhere you look on baking blogs, websites, food shows and even in the New York Times, people are discussing and fighting over the best chocolate chip cookie recipe. I won't even begin to claim that I have found that. Opinions vary so much that it is an impossible statement. If Jillian shared her grandmother's chocolate chip cookie recipe, I'd be tempted to call it the best, but she hasn't and she won't, so I'm stuck with this one. Which, actually, I'm pretty okay with as it is freaking tasty and awesome. The honey really ads something to the flavor, even though I just used regular honey flavored honey as opposed to the floral stuff that everyone seems to favor. (Bleck!) I'm in love with honey just the way it is.


This recipe came from Baking Bites, another lovely blog with tons of recipes that you should definitely check out.

Ingredients:
Honeyed Chocolate Chip Cookies
1 cup butter, room temperature
1 cup brown sugar
1/4 cup white sugar
1/4 cup honey
2 large eggs
2 1/4 cups all purpose flour
1/2 tsp baking soda
1 tsp salt
2 cups chocolate chips

Directions:
Preheat oven to 325 degrees Farenheit. Line a baking sheet with parchment paper.
In a large bowl, cream together butter and sugars until light and fluffy. Beat in honey and both eggs, individually.
In a medium bowl, whisk together flour, baking soda and salt. On a low speed, gradually incorporate flour mixture into honey mixture. Stir in chocolate chips.
Use a small-ish scoop to create 1-inch balls and place onto prepared baking sheet, leaving about 2 inches between each cookie to allow for the dough to spread. (And, these do spread quite a bit, so err on the side of too much space.)
Bake for 12-15 minutes, until cookies are golden brown. Cool for 3-4 minutes on the baking sheet, then transfer to a wire rack to cool completely.

Makes about 4-dozen cookies

Saturday, September 13, 2008

Not So Outrageous Brownies

This was another one of those baked goods for the Longaberger ladies.
This trip was a whole lot of pain, not to mention the getting up at 4 a.m. post adventures in late night baking.
The recipe came from the Cookie Madness, a virtual treasure trove of cookie and brownie recipes. Most of the stuff I find there turn out pretty well. These, not so much. I don't know what is wrong with me, the texture turned out great, but I just didn't like the added flavor from the instant espresso powder. Of course, I hate coffee in general, so probably you shouldn't judge these based on me.
The Oreos tended towards disintegration, which I didn't appreciate, but the artificially based filling stood up to the test in the oven and was easily discernible in the brownies. I would probably make these again, forgoing the additional coffee flavor for an extra bit of vanilla.


Ingredients:


8 ounces unsalted butter
8 ounces plus 4 ounces semisweet chocolate chips (12 oz total)
3 ounces unsweetened chocolate
3 large eggs
1 tablespoon pure vanilla extract
1 cup plus 2 tablespoons granulated sugar
1/2 cup plus 2 tablespoon all-purpose flour
1 1/2 teaspoons baking powder
1/2 teaspoon salt
2 teaspoons instant espresso powder
8 Oreo cookies, broken up

Directions:
Preheat the oven to 350ยบ. Line a 13×9 inch metal pan with foil and spray foil with cooking spray.

Melt the butter, 8 ounces semi-sweet chocolate chips and the unsweetened chocolate in a medium bowl over simmering water. Allow to cool slightly.

Stir (do not beat) eggs, vanilla, and sugar together in a large mixing bowl. Stir the warm chocolate mixture into the egg mixture and cool to room temperature.

Stir 1/2 cup of flour, the baking powder, salt and espresso powder together in another bowl then add to the cooled chocolate mixture. Toss the Oreo chunks and 4 ounces of chocolate chips in a medium bowl with remaining 2 tablespoon of flour, then add them to the chocolate batter. Pour into pan

Bake for 20 minutes, then rap the baking sheet against the oven shelf to force the air to escape from between the pan and the brownie dough. Bake for about 10 minutes more, or until a toothpick comes out clean. Do not overbake! Allow to cool, then chill brownies. Lift from pan and cut into squares.

Makes about 32 (Or so the recipe said, I ended up with maybe 20, but apparently I make my brownies overly large...it's how I like things.

Doughnut Muffins! = Delicious


Yum. Yum. Yummy. This are much easier than they sound, especially if you come up with a better way to dip them than by burning the tips of your fingers like I did. Robin took several young hoodlums to Longaberger Mecca, Dresden, Ohio, for a Saturday and I was urged to provide some baked sustenance for the arduous journey. I thought these sounded pretty good for a breakfasty type baked good. I chose to make mine into mini-muffins instead of full-sized, which ended up turning out really well, they tasted just like cinnamon sugar doughnut holes and they stayed really moist over the next few days.


Doughnut Muffins
Ingredients:
1/3 cup oil
1/2 cup sugar
1 egg
1 1/2 cups flour
2 tsp baking powder
1/2 tsp salt
1/4 teaspoon cinammon
1/4 teaspoon nutmeg
1/2 cup milk

Topping (I pretty much doubled this)
1/2 cup sugar
1/2 cup melted butter
1 teaspoon cinnamon

Directions:
Preheat oven to 350 degrees. Spray and flour a mini-muffin pan. Don't use paper liners.
Cream oil 1/2 cup sugar and egg in a medium bowl.
In a seperate small bowl mix flour, baking powder, salt, nutmeg and cinnamon together. Alternate adding the flour mixture and 1/2 cup milk to the cremed mixture. Flour-Milk-Flour-Milk-Flour. Spoon the batter into greased mini muffin tins about 1/2 full and bake for 12-15 minutes.
Melt the butter for the dipping mixture in a small bowl. Combine the sugar and cinnamon in another bowl. When the muffins are done remove them from the tin, and immediately dip them into the melted butter and then roll them in the cinnamon sugar mixture. Let rest on a cooling rack or some paper towels.

Monday, June 23, 2008

Coca-Cola Cake!


MMMMM......Cola Cake! If you have ever wondered before, this is my most favoritest cake. Or, if you are into grammar conventions, my absolute favorite. I don't remember a time when this hasn't been the cake I judge all other cakes against.
My grandmother used to make it almost every year for my birthday, but that was a long time ago. She passed away last year, but she had stopped baking or doing much of anything long before that. Several years ago, my friend Katie went to the effort of baking a coca cola cake for my birthday. It wasn't the prettiest (she didn't realize that they never are very attractive.) but it was delicious. The fact that she made the attempt is one of the many reasons that I love her dearly. Earlier this year, Mom #2 made one for me at work. It was fabulous, but it also made me realize something....at this point, shouldn't I be able to make my own freaking coca cola cake? I had been baking all of this stuff, and it never once occured to me that I should attempt it too.

I should forewarn you that this is the most horrible, bad for you cake around. If you aren't looking for that, don't read any further.


This particular recipe came from the Coke website.

The link connects to a list of coca cole related recipes. My favorite and the one pictured is the Coke Cake. Beware the listing for chocolate cola cake. It is a dirty liar and not nearly as tasty as this one.


Recipe
Cola Cake:
2 cups all purpose flour
2 cups sugar
1/2 cup butter
1/2 cup vegetable oil
3 tablespoons cocoa
1 cup Coca-Cola
1 teaspoon baking soda
1/2 cup buttermilk
1 1/2 cups miniature marshmallows
2 eggs, beaten
1 tsp vanilla extract

Frosting:
1/2 cup butter
3 tablespoon cocoa
6 tablespoons Coca-Cola
16 ounces = 1 box confectioner's sugar
1 cup chopped pecans
1 tsp vanilla extract

Sift together flour and sugar into large bowl. (I'm not sure how important the sifting bit is, I've always done it the way they recommend. I never want to chance messing up my cake.) Add marshamllows.

In a saucepan, mix butter, oil, cocoa and coca-cola. Bring to a boil. (I make sure to melt the butter a bit by itself first, things seem to go more smoothly that way.)

Pour the mixture over top the sugar/flour/marshmallows and blend well.

Dissolve baking soda in buttermilk just before adding it to the batter along with the eggs and vanilla extract.

Pour into a greased 9x13 jellyroll pan. Bake for 30-45 minutes.

While the cake is baking go ahead and prepare the frosting.


Combine buter, cocoa powder and coca cola in a saucepan. (Again I recomment melting the butter a bit first.) Bring to a boil and pour over confectioners' sugar and blend well. Add vanilla extract and crushed pecans.

ICE CAKE WHILE HOT! DIRECTLY OUT OF THE OVEN! (I am using capital letters, not because my caps lock key got stuck, but because this part is important!

ENJOY! (Obviously, this part is also vital.)

**I will also recommend using the 9x13 jelly roll sized pan listed in the recipe. The cake comes out thinner and better and that is, after all, the point. Also if you are a dirty rotten scoundrel like me, you might want to double the frosting recipe. You want to shoot for a roughly 50-50 ratio between cake and icing.**

Butterfinger Bars


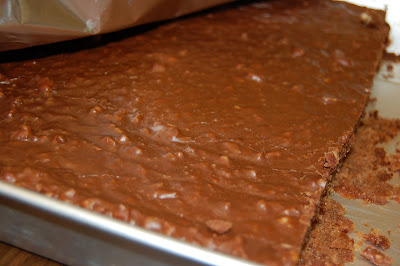
It seems like a lifetime ago that I made these. So long ago, I don't even remember where the recipe came from or where it is just now. I remember that it was different from most "butterfinger" recipes in that it actually involved the use of butterfingers, not an attempt at replicating the taste itself. I'll go ahead and post the photos and then add the recipe once I find it.


If you care to take notice, these were baked in my fabulous "new" a.k.a. new to me pans. They are vintage and I didn't even have to go looking for them, just had to ask my grandma! I love the metal pans with the matching slide on lids. Grandma gave me two! :-)

Tuesday, June 3, 2008

Mom's Cherry Cordials

I too, am alive. I graduated a month ago, and let's just say I needed a short hiatus from just about everything. I did start baking again, but I just need to catch up on the blogs!


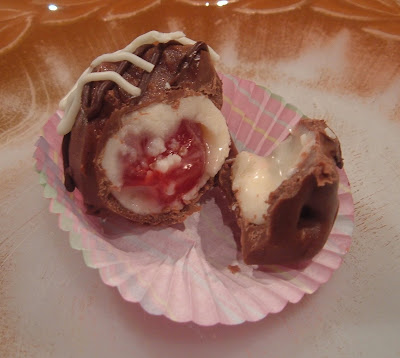
My Mom really loves cherry cordials. I buy some for her on almost every holiday that is appropriate. I decided that I would try making them myself this year. I personally like the look of the hand dipped candies versus the molded ones, so that's what I decided to make.

I always wondered how cherry cordials got their gooey center, and now I know! The center is actually a fondant that is wrapped around the cherry. After you coat it in chocolate and let it sit at room temperature for a few days, it liquefies.


Unfortunately, I was too afraid that the chocolate would melt, so I kept these in the fridge. The centers didn't liquefy, but they were still tasty!


I used the recipe found here. I made about 30 cherries (however many were in one jar), and I only used about half of the fondant. I also drizzled on some white and dark chocolate after I dipped them in the milk chocolate. It was hard to drizzle around the stem, but I still think they turned out nicely!

I gave a nice box to Mom and had some extras to share with the family. Everyone loved them! Even some people who haven't liked cherry cordials in the past enjoyed these! Mom especially loved them! She said they were "nummy" and "melted in her mouth." The only problem is that now she might be expecting them a lot more often!

Thursday, May 29, 2008

I'm Alive

I have done some baking since my last post, but my oven hasn't even been turned on in over a week. The weight loss from the lack of baked goods at work is astounding.
No excuses for a lack of oven adventures, but I've had a very insane week and a half. Dad had emergency open heart surgery to remove an anuerism on his aorta, repair an aortic disection and a double bypass and I spent most of my time driving back and forth from work to Jewish Hospital in Louisville, Ky. He is back at his home again and I just finished a large-ish/tedious special section at work so I should have some time again.

Angela has been in from her Peace Corps adventures so that has been great. Hopefully I'll get some time to do some baking for her before she leaves us again until December.

In other news:

Kristen Bell and Michael Ausiello Have My Vote for the

Sunday, May 11, 2008

Mother's Day: Dorie's Peanut Butter Torte

This was the second of the two Mother's Day desserts. Personally, I preferred the strawberry cake, but both of them ended up getting consumed, so I'll call it a wash.


Dorie Greenspan's Peanut Butter Torte
from "Baking, From My Home to Yours"

Ingredients:
1 ¼ c. finely chopped salted peanuts (for the filling, crunch and topping)
2 teaspoons sugar
½ teaspoon instant espresso powder (or finely ground instant coffee)
¼ teaspoon ground cinnamon
Pinch of freshly grated nutmeg
½ c. mini chocolate chips (or finely chopped semi sweet chocolate)
24 Oreo cookies, finely crumbed or ground in a food processor or blender
½ stick (4 tablespoons) unsalted butter, melted and cooled
Small pinch of salt
2 ½ c. heavy cream
1 ¼ c confectioners’ sugar, sifted
12 ounces cream cheese, at room temperature
1 ½ c salted peanut butter – crunchy or smooth (not natural; I use Skippy)
2 tablespoons whole milk
4 ounces bittersweet chocolate finely chopped


Directions:
Getting ready: center a rack in the oven and preheat the oven to 350°F. Butter a 9-inch Springform pan and place it on a baking sheet lined with parchment or a silicone mat.
Toss ½ cup of the chopped peanuts, the sugar, espresso powder, cinnamon, nutmeg and chocolate chops together in a small bowl. Set aside.

Put the Oreo crumbs, melted butter and salt in another small bowl and stir with a fork just until crumbs are moistened. Press the crumbs evenly over the bottom and up the sides of the spring form pan (they should go up about 2 inches on the sides). Freeze the crust for 10 minutes.
Bake the crust for 10 minutes, then transfer it to a rack and let it cool completely before filling.

Working with a stand mixer fitted with the whisk attachment or with a hand mixer in a large bowl, whip 2 cups of the cream until it holds medium peaks. Beat in ¼ cup of the confectioners’ sugar and whip until the cream holds medium-firm peaks. Crape the cream into a bowl and refrigerate until needed.

Wipe out (do not wash) the bowl, fit the stand mixer with the paddle attachment if you have one, or continue with the hand mixer, and beat the cream cheese with the remaining 1 cup confectioners’ sugar on medium speed until the cream cheese is satiny smooth. Beat in the peanut butter, ¼ cup of the chopped peanuts and the milk.
Using a large rubber spatula, gently stir in about one quarter of the whipped cream, just to lighten the mousse. Still working with the spatula, stir in the crunchy peanut mixture, then gingerly fold in the remaining whipped cream.Scrape the mouse into the crust, mounding and smoothing the top. Refrigerate for at least 4 hours, or overnight; cover with plastic wrap as soon as the mousse firms.

To Finish The Torte: put the chopped chocolate in a heatproof bowl and set the bowl over a saucepan of simmering water. Leave the bowl over the water just until the chocolate softens and starts to melt, about 3 minutes; remove the bowl from the saucepan.
Bring the remaining ½ cup cream to a full boil. Pour the cream over the chocolate and, working with a a rubber spatula, very gently stir together until the ganache is completely blended and glossy.
Pour the ganache over the torte, smoothing it with a metal icing spatula. Scatter the remaining ½ cup peanuts over the top and chill to set the topping, about 20 minutes.
When the ganache is firm, remove the sides of the Springform pan; I had no problems removing the pan, but you can also wrap a hot damp kitchen towel around the pan and leave it there for 10 seconds. Refrigerate until ready to serve. *I actually refrigerated mine in the springform pan because I was worried about something getting knocked into it while in the fridge. I didn't encounter any problems from that.


TORTE!